
In this tutorial I will show you how to add a Flash animation to your presentation. I will be using PowerPoint 2007 but the general idea can be used for both 2003 and 2010.
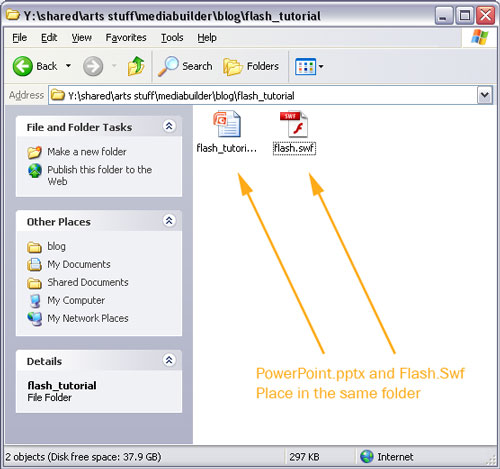
One important thing to keep in mind - Flash files are not saved with your presentation, it is important that the Flash file is in the same file folder as your finished PowerPoint presentation. If you ever transfer your presentation to another computer, the flash file needs to be transferred as well, or your presentation will "loose" the animation.
Step One.
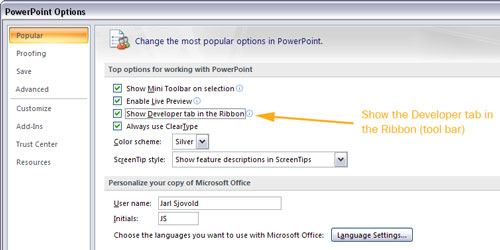
Click on the Developer Tab in the PowerPoint Ribbon (Tool Bar).
If you don't see the Developer Tab, you can unhide it in the PowerPoint Options. Check "Show Developer tab in the Ribbon" See illustration below.
Step Two.
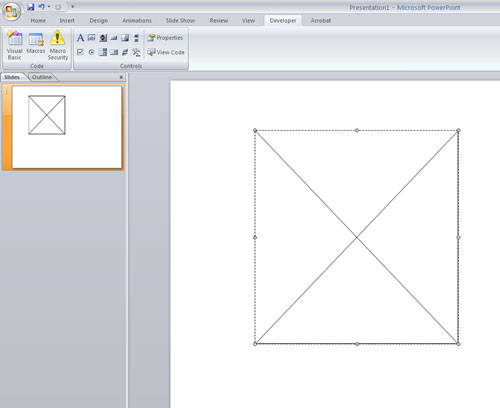
In the Developer Tab, click on "More Tools" in the Controls area.

Step Three.
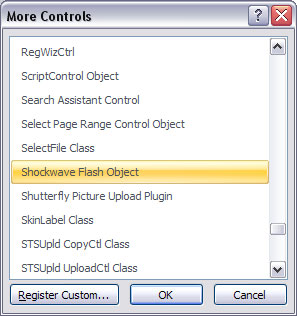
From the menu that appears, select "Shockwave Flash Object" and click "OK". (Note: If you do not see the Shockwave Flash Object, you will need to install Flash Player on your computer. It's best to use Internet Explorer to install Flash as this will insure the that Active X controls also are registered for use in PowerPoint. You also may need to uninstall Flash and reinstall with IE if you already have Flash Player.)
Step Four.
Click and Drag anywhere on your slide to create a box on your PowerPoint slide, you don't need to worry about the exact size at this point, you can resize it later. The box will have a big black x in it, that is normal.
Step Five.
Right click your mouse on the new box and select "Properties"

Step Six.
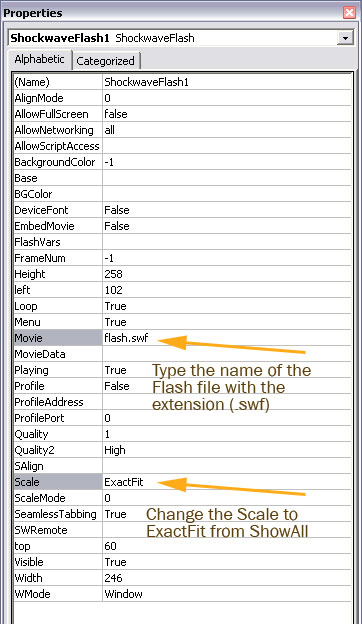
In the Flash Properties Panel you will need to change two things. In the "Movie" area you need to add the full file path and name of the Flash file you wish to insert. If you have saved the Flash animation in the same directory as your final presentation, you can just type the name of the file here, for example, flash_file.swf.
In the scale area, you should change "ShowAll" To "ExactFit". This isn't necessary but will result in a much cleaner end result. The ShowAll function tends to leave a black border around some of the edges of the Flash animation.
Step Seven (Optional)
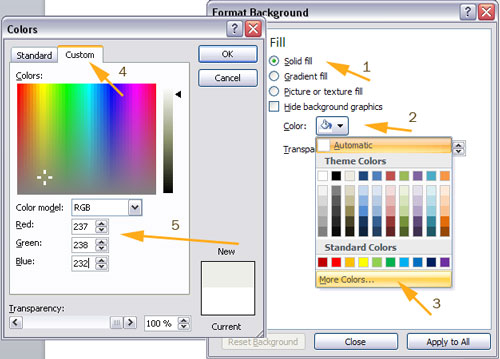
Finally you should change the background color of your PowerPoint slide to match the background of the Flash animation, this makes a nice seamless look to your slide. When you downloaded a .SWF Flash file from PresenterMedia, you could have chosen a colored background. If you did, follow this section to mach the backgrounds.

In PowerPoint, select "Format Background", found by right clicking on the slide background and choosing it from the menu that appears.
Choose a Solid Fill, select "More Colors" from the Color Menu, and finally under "Custom" you can enter the RGB values from above.
Step Eight
Save your presentation, making sure that your Flash file and final presentation are in the same directory or File Folder.
Step Nine.
Play your presentation. Wow - Flash in PowerPoint!
© 2009-2021 Eclipse Digital Imaging, Inc.
Quality PowerPoint Templates, Animations, videos, and 3D Clipart.
PowerPoint® is a registered trademark
of Microsoft Corporation.